Growing greens and micro-greens indoors
With the price of food rising and availability dicey, boosting food production in any way possible can only help. There’s nothing cheaper or more available than the food you grow yourself! Both greens and micro-greens can be grown indoors, even in winter, even in an apartment. This article will tell you how!
How to grow salad micro-greens
Growing salad greens is the easiest of these two options, so we’ll tackle that first. If you’re already starting your own seeds, then you may have all of the equipment you need. A good, bright, south-facing window might be enough but grow lights will be better, especially if you live in a colder area.
The winter sun’s light tends to be weaker than during summertime because of the Earth’s rotation and tilt of its axis. So in winter, when the tilt puts our windows a bit further from the sun, the light coming through them is weaker. Also, the winter cold will affect any plants you try to grow by a window. Therefore, grow lights (and possibly a heat mat) can help.
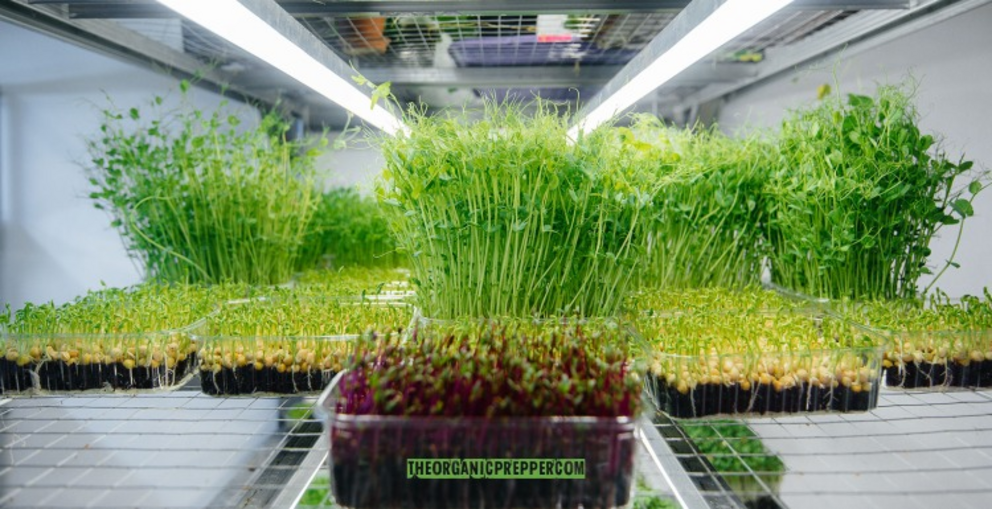
You’ll also need trays or pots with some drainage, potting soil or other growing media, and of course, seeds. Pot them up, give them water and 12-14 hours of light per day, and in 30-60 days, you’ll be eating yummy food that you produced yourself!
I’ve also grown cat grass in this way. Why should I pay $5-$15 to Chewy for a little grow bag kit when I can grow my own, much more cheaply and in greater quantity?
So set up your trays, seed them, water them, and let Nature take her course!
But what about growing micro-greens?
Micro-greens are just as easy, really. First, what exactly is a micro-green? It’s the cotyledon and first true leaves of the plant. They’re usually cut at 1” to 1-1/2” high, which means you won’t be able to save the seed from them. These are different from sprouts, which are simply germinated seeds that are produced almost entirely in water. Sprouts can certainly be added to your diet and like micro-greens, are a good use for old seeds.
The nutritional benefits of micro-greens are many. They’re high in antioxidants, for one thing. They also contain protein, fiber, carbohydrates, and a wide range of vitamins and minerals, including magnesium, zinc, potassium, phosphorus, vitamins B and C, and others. What’s not to love?
What equipment is needed to grow micro-greens?
Pretty much the same as above, since, unlike sprouts, these are grown in soil. You can also use peat moss, coco coir, or seed mats. Since the plants won’t develop deep roots, they won’t need a deep space like a nursery pot. A shallow tray that drains well will work nicely and can be obtained cheaply from a number of sources. Better yet, clean food containers can be used for this purpose! A few drainage holes are very easy to make, and repurposed containers are free. Drainage, as with any other plant, is necessary to keep mold from developing.
So what’s the procedure? Well, pretty much the same as above.
Prepare your flats, soak your seed, seed them, water them, give them plenty of light and keep them warm. Seed them heavily as the more you seed, the more greens you’ll have. There’s no need to worry about seedlings crowding each other out since you’ll harvest them long before then. Covering them with plastic or a humidity tent can speed germination, but remember to uncover them as soon as you see them break the soil.
Since you’re not growing them to maturity, your greens can be ready to eat in as little as 14 days! You might even consider succession planting by planting one flat every week, so you can harvest fresh greens one week at a time rather than having all of your greens ready in quantity too large to eat before spoiling.
What seeds should I buy?
What seeds are best for this purpose? A surprising variety! Broccoli, kale, peas, arugula, radish, amaranth, chia, mustard, beet, buckwheat, chard, cabbage, cilantro, fenugreek, and basil, to name a very few. While you can use your old excess seed for this purpose, please be aware that some seeds intended for garden use are treated with fungicides to inhibit damping-off disease for one thing. You don’t want to eat that!
Also, you’ll need way more seed for this purpose than you’ll get in a standard garden seed packet. You may need five grams or more of seed to seed a flat of micro-greens, which is much more than you’ll get in a seed packet. Micro-green seed packets are much cheaper, and you can, in fact, use any extra seed in your garden!
So unless you have a ton of old seed to get rid of, buying seeds specific to the micro-green process is actually more economical than using garden seed. As an aside, bird or wild animal seed isn’t good for this purpose, partly due to how it’s packed and treated. So nix that idea!
Caveats you need to know about
There are some contamination risks, however, for example, E. coli. Some varieties are more susceptible than others, and the risk increases with storage time. Risk can be mitigated in a number of ways. Some use commercial chlorinated packets, some rinse the plants frequently, and some simply spritz with chlorinated water from the tap before eating. The shelf life of micro-greens is 10-14 days after harvest, similar to any other leafy green. If it’s been a few days since harvest and your greens are looking like a college biology experiment, don’t eat them.
What happens with the end product?
So what are we going to do with all of the food we’re producing? If you’re looking for new ideas, check out the Cookbook Bundle! Three cookbooks, including shopping lists that can help you provide tasty meals for you and your family on a budget!